![R.E.M Spring Facial Hair Remover - The Original Hair Removal Spring [Design Patent]. Removes Hair from Upper Lip, Chin, Cheeks and Neck. 100% Stainless Steel](https://m.media-amazon.com/images/I/41oXBWW6qoL._SL160_.jpg)


Are you tired of spending a fortune at the salon for hair removal treatments? Look no further! In this complete guide to DIY sugar waxing, you will learn how to achieve smooth, hair-free skin right from the comfort of your own home.
With just a few simple ingredients and supplies, you can save time and money while still achieving professional-quality results.
In the first section, you will discover the numerous benefits of DIY sugar waxing. From the natural and gentle ingredients used to the long-lasting results it provides, you’ll see why this method is becoming increasingly popular.
Next, we will guide you through gathering the necessary ingredients and supplies, all of which can easily be found in your kitchen or local grocery store.

Once you have everything you need, we will walk you through the step-by-step process of making the sugar wax, ensuring that you have the perfect consistency for effective hair removal.
So get ready to say goodbye to unwanted hair and hello to silky smooth skin, all without ever leaving your home!
Key Takeaways
- Ideal temperature for sugar waxing is 98°F or 37°C
- Test wax on small area before applying to larger areas
- Use gentle, lightweight moisturizer formulated for post-waxing care
- Regularly exfoliate waxed areas to prevent ingrown hairs
Understanding the Benefits of DIY Sugar Waxing
If you’re tired of spending a fortune on hair removal treatments, it’s time for you to discover the amazing benefits of DIY sugar waxing! The science of sugar waxing is quite simple yet effective.
The sugar mixture is heated and applied to the skin, allowing it to stick to the hair. As you pull off the sugar wax, it removes the hair from the root, resulting in a smoother and longer-lasting hair-free skin.

This method is not only cost-effective but also more gentle on the skin compared to other hair removal techniques.
One of the long term benefits of DIY sugar waxing is that it helps to reduce hair growth over time. When you regularly wax using sugar, it weakens the hair follicles, making the hair grow back finer and sparser.
Unlike shaving, which only cuts the hair at the surface and causes it to grow back thicker, sugar waxing actively works to minimize hair growth.
Additionally, the results of sugar waxing last longer than other methods like shaving or depilatory creams. Since the hair is removed from the root, it takes longer for new hair to grow back, leaving you with smooth skin for weeks at a time.

So, by incorporating DIY sugar waxing into your hair removal routine, you can save money and enjoy the long-term benefits of reduced hair growth and longer-lasting results.
Gathering the Ingredients and Supplies
To get started with DIY sugar waxing, you’ll need some simple ingredients for the sugar wax such as sugar, lemon juice, and water.
Additionally, you’ll need essential tools for application like a saucepan, a candy thermometer, and cloth strips for removing the wax.
Before waxing, it’s important to prepare your skin by exfoliating and making sure it’s clean and dry.
Simple Ingredients for Sugar Wax

One of the key elements in creating homemade sugar wax is the use of common household ingredients. When it comes to natural alternatives for hair removal, you don’t need to look further than your kitchen pantry.
The basic ingredients for sugar wax are sugar, lemon juice, and water. These simple ingredients are readily available in most households, making it convenient and cost-effective to make your own sugar wax at home.
Sugar serves as the main component of the wax, providing the stickiness needed to remove hair effectively. Lemon juice acts as a natural preservative and also helps to break down the sugar, making it easier to apply and remove. Water is used to create the right consistency for the wax, ensuring that it spreads smoothly on your skin.
By using these common ingredients, you can create a homemade hair removal solution that is gentle on your skin and free from harsh chemicals.
Essential Tools for Application
Creating your own sugar wax requires a few essential tools for smooth and precise application. The first tool you’ll need is a heat-resistant container to melt the sugar and other ingredients. This can be a microwave-safe bowl or a small saucepan, depending on your preferred method of heating.
Additionally, you’ll need a wooden spatula or popsicle stick for stirring the mixture and applying it to your skin. The wooden material is ideal because it doesn’t retain heat and is easy to clean.
Another essential tool for sugar waxing is fabric strips or muslin strips. These strips are used to remove the wax and hair from your skin. You can either purchase pre-cut strips or cut them to your desired size using fabric scissors. It’s important to have enough strips on hand for multiple applications, as they can become saturated with wax and less effective over time.
Lastly, having a clean and dry surface is crucial for successful sugar waxing. Make sure to thoroughly wash and dry the area you plan to wax before application.
When it comes to hair removal, sugar waxing techniques have gained popularity as a natural and effective alternative to traditional methods. Unlike shaving or using chemical-based creams, sugar waxing removes hair from the root, resulting in longer-lasting smoothness. Additionally, sugar wax is made from simple and natural ingredients, making it a safer option for those with sensitive skin.
By using the essential tools mentioned above and following proper techniques, you can achieve salon-quality results in the comfort of your own home.
Preparing Your Skin for Waxing
Before you begin waxing, make sure your skin is well-prepared by exfoliating and moisturizing for a smooth and flawless result.
Exfoliating techniques are essential to remove dead skin cells and any buildup that might interfere with the waxing process. You can use a gentle scrub or a loofah to exfoliate your skin before waxing. Gently massage the scrub onto your skin in circular motions, paying extra attention to the areas where you plan to wax. This will help remove any dirt, oil, or dead skin cells, allowing the wax to adhere better to the hair and minimize the chances of ingrown hairs. Remember to be gentle and avoid scrubbing too hard, as this can irritate the skin.
After exfoliating, it’s important to moisturize your skin to keep it hydrated and prevent any dryness or irritation. Choose a lightweight, non-greasy moisturizer that won’t interfere with the waxing process. Apply the moisturizer to your skin, focusing on the areas where you’ll be waxing. This will help soften the hair follicles and make it easier for the wax to grip the hairs. Additionally, moisturized skin is less likely to experience redness or irritation after waxing. Make sure to wait for the moisturizer to fully absorb into the skin before applying the wax to avoid any interference or difficulties during the hair removal process.
Following these exfoliating techniques and moisturizing tips will ensure that your skin is well-prepared for waxing, resulting in a smooth and successful hair removal experience at home.
Making the Sugar Wax
To start the process of making the sugar wax, gather all the necessary ingredients and utensils. Here’s what you’ll need:
- 2 cups of granulated sugar
- 1/4 cup of lemon juice
- 1/4 cup of water
- A medium-sized saucepan
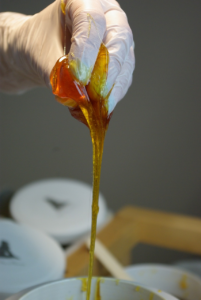
First, you’ll want to heat the sugar to the right temperature. Place the saucepan on the stove over medium heat and add the granulated sugar, lemon juice, and water. Stir the mixture until the sugar has completely dissolved. This will take about 5 minutes. Be sure to keep a close eye on the mixture to prevent it from burning.
Next, you’ll need to achieve the right consistency. Continue heating the mixture over medium heat, stirring occasionally. As the mixture heats up, it will begin to bubble and thicken. You want the sugar wax to reach a temperature of about 250 degrees Fahrenheit (121 degrees Celsius). To check if it’s ready, you can use a candy thermometer or perform a ‘thread test.’
Take a small amount of the mixture and drop it into a cup of cold water. If it forms a soft ball that can be easily molded between your fingers, it’s ready.
Once you’ve achieved the right consistency, remove the saucepan from the heat and let it cool for a few minutes. The sugar wax should be thick and sticky, but still pliable. Congratulations, you’ve successfully made your own sugar wax for hair removal at home!
Preparing for the Waxing Process
Now, let’s get ready for the waxing process by gathering all the necessary supplies and preparing your skin.
First, it’s important to do a pre-waxing exfoliation. This step helps to remove dead skin cells and allows the wax to adhere better to the hair, resulting in a more effective hair removal. You can use a gentle exfoliating scrub or a loofah to gently massage your skin in circular motions. Focus on the areas you’ll be waxing, such as your legs, arms, or bikini line. Remember to be gentle and avoid scrubbing too hard, as this can irritate the skin.
Next, it’s crucial to choose the right waxing temperature. If the wax is too hot, it can cause burns and discomfort, while if it’s too cold, it won’t effectively remove the hair. The ideal temperature for sugar waxing is around body temperature, which is approximately 98 degrees Fahrenheit (37 degrees Celsius). To achieve this, you can heat the wax in a microwave or on a stovetop using a double boiler method. Test the temperature of the wax on a small area of your skin before applying it to the larger areas. It should feel warm and comfortable, not too hot or too cold.
By ensuring the right temperature, you’ll have a more comfortable and successful waxing experience.
Performing the Waxing Procedure
Once you’ve prepped your skin and checked the wax temperature, it’s time to dive into the waxing process! There are several hair removal techniques you can use when performing sugar waxing at home.
One popular technique is the strip method, where you apply the wax in the direction of hair growth and then quickly remove it using a cloth strip. This method is great for larger areas like legs or arms.
Another technique is the hand flick method, which is ideal for smaller areas like the eyebrows or upper lip. With this technique, you apply the wax in the opposite direction of hair growth and then flick it off with your hand.
Whichever technique you choose, make sure to apply the wax in small, manageable sections to avoid discomfort or messiness.
Now that you know the different hair removal techniques, let’s talk about some waxing tips to ensure a successful DIY waxing session.
First and foremost, always pull the wax strip or flick the wax in the opposite direction of hair growth. This will help to remove the hair from the root and minimize the chance of breakage or ingrown hairs.
Additionally, make sure to hold the skin taut when removing the wax to minimize pain and achieve a cleaner waxing result.
Lastly, if you find that the wax is becoming too sticky or difficult to remove, you can dust some baby powder or cornstarch on the area to help absorb excess moisture and make the waxing process smoother.
Remember, practice makes perfect, so don’t be discouraged if your first few attempts aren’t perfect. With time and experience, you’ll become a pro at DIY sugar waxing!
Post-Waxing Care and Maintenance
After completing the waxing process, it is crucial to take proper care of your skin to ensure a smooth and flawless result. One important step in post-waxing care is moisturizing. Waxing can strip the skin of its natural oils, leaving it dry and irritated. Applying a moisturizer after waxing helps to soothe and hydrate the skin, reducing any redness or inflammation. Look for a moisturizer that is gentle and lightweight, preferably one that is specifically formulated for post-waxing care. Apply it generously to the waxed areas, gently massaging it into the skin until fully absorbed. This will not only leave your skin feeling soft and supple but also help in preventing any dryness or flakiness.
In addition to moisturizing, dealing with ingrown hairs is another important aspect of post-waxing care. Ingrown hairs occur when the hair grows back into the skin instead of outwards. They can be painful and cause red bumps or irritation. To prevent ingrown hairs, exfoliating the waxed areas regularly is essential. This helps to remove dead skin cells and unclog the hair follicles, allowing the hair to grow out properly. You can use a gentle exfoliating scrub or a loofah to gently scrub the waxed areas in circular motions. Additionally, avoid wearing tight clothing that may rub against the waxed areas and cause irritation. By following these post-waxing care tips, you can maintain smooth and healthy skin after DIY sugar waxing.
| Post-Waxing Care Tips | Benefits | ||
|---|---|---|---|
| Moisturizing after waxing | Helps soothe and hydrate the skin, reducing redness and inflammation. | ||
| Dealing with ingrown hairs | Prevents painful and irritated ingrown hairs by exfoliating regularly. | ||
| Avoiding tight clothing | Minimizes rubbing and irritation on the waxed areas. | Using a gentle, fragrance-free moisturizer is recommended for moisturizing after waxing to maintain the skin’s moisture barrier and promote healing. |
Frequently Asked Questions
How long does DIY sugar waxing typically last before hair regrowth occurs?
Typically, DIY sugar waxing can last around 2-6 weeks before hair regrowth occurs. Making your own sugar wax at home is a cost-effective and natural alternative to traditional hair removal methods. By combining sugar, lemon juice, and water, you can create a sticky paste that effectively removes hair from the root.
However, it’s important to consider the pros and cons of DIY sugar waxing. On the positive side, it’s a gentle and all-natural method that is less likely to cause skin irritation compared to other hair removal techniques. Additionally, the results can last longer than shaving or using depilatory creams.
However, DIY sugar waxing can be time-consuming and messy, especially for beginners. It may take some practice to achieve the desired results, and it can be a bit painful, especially for those with sensitive skin.
Despite the potential drawbacks, many people find DIY sugar waxing to be a convenient and affordable way to remove unwanted hair at home.
Can DIY sugar waxing be used on all skin types?
DIY sugar waxing can be effective on different hair textures, as it helps to remove hair from the root, resulting in a longer-lasting smoothness. However, it’s important to note that coarse or thick hair may require more passes to completely remove the hair.
When comparing DIY sugar waxing to other hair removal methods for different skin types, it’s generally considered safe for all skin types, including sensitive skin. Unlike shaving, which can cause irritation and ingrown hairs, sugar waxing is a gentler option that exfoliates the skin and helps to prevent ingrown hairs.
Additionally, unlike chemical hair removal creams, sugar waxing doesn’t contain harsh chemicals that can potentially irritate the skin. Overall, DIY sugar waxing can be a versatile and effective option for hair removal on various skin types, providing longer-lasting results compared to other methods.
Are there any specific precautions or considerations for individuals with sensitive skin?
When it comes to individuals with sensitive skin, there are a few precautions and considerations to keep in mind. First and foremost, it’s important to patch test any products you plan on using to ensure they don’t cause any adverse reactions.
Look for the best products for sensitive skin, such as gentle wax formulas specifically designed for this skin type. Additionally, be cautious of the temperature of the wax, as sensitive skin may be more prone to irritation and burns.
It’s also a good idea to exfoliate and moisturize the skin beforehand to minimize any potential discomfort. Overall, taking these precautions and using suitable products will help ensure a more comfortable and safe waxing experience for those with sensitive skin.
What is the recommended frequency for DIY sugar waxing?
The recommended frequency for DIY sugar waxing depends on your hair growth and personal preference. Generally, it’s recommended to wax every 4 to 6 weeks. This allows enough time for your hair to grow back to a length that’s suitable for waxing again.
DIY sugar waxing offers several benefits. Firstly, it helps to remove hair from the root, resulting in smoother and longer-lasting results compared to shaving. Additionally, regular waxing can lead to reduced hair growth over time. It also exfoliates the skin, leaving it feeling soft and smooth.
Another advantage is that DIY sugar waxing can be done in the comfort of your own home, saving you time and money compared to salon visits. So, by following the recommended frequency and enjoying the benefits of DIY sugar waxing, you can achieve smooth and hair-free skin.
Can DIY sugar waxing be used on facial hair or is it more suitable for body hair removal?
Yes, DIY sugar waxing can be used for facial hair removal as well as body hair removal. It’s a versatile and effective method that can be used on various areas of the body.
While there are alternative hair removal methods available, such as shaving and using depilatory creams, DIY sugar waxing provides a longer-lasting result by removing hair from the root. This makes it a popular choice for those looking for a more thorough and efficient hair removal method.
Whether you want to remove facial hair or body hair, DIY sugar waxing can be a convenient, cost-effective, and efficient option.
Conclusion
In conclusion, DIY sugar waxing can be a cost-effective and efficient way to remove unwanted hair in the comfort of your own home. By understanding the benefits of this method and gathering the necessary ingredients and supplies, you can easily make the sugar wax and prepare for the waxing process.
With a little practice and patience, you can confidently perform the waxing procedure, achieving smooth and hair-free skin.
After the waxing is done, it’s important to take care of your skin by following the post-waxing care and maintenance routine. This includes avoiding hot showers or baths, exfoliating the skin regularly, and applying soothing creams or lotions to reduce any irritation.
By following these steps, you can prolong the results of your DIY sugar waxing and maintain smooth, hair-free skin for longer periods of time. So why not give it a try and experience the benefits of DIY sugar waxing today?