![R.E.M Spring Facial Hair Remover - The Original Hair Removal Spring [Design Patent]. Removes Hair from Upper Lip, Chin, Cheeks and Neck. 100% Stainless Steel](https://m.media-amazon.com/images/I/41oXBWW6qoL._SL160_.jpg)


Are you tired of spending a fortune on professional waxing treatments? Do you want an affordable and convenient alternative for hair removal? Look no further! In this article, we will guide you through the process of making your own DIY hair removal wax.
Say goodbye to expensive salon visits and hello to smooth, hair-free skin in the comfort of your own home.
Gathering the necessary ingredients and supplies is the first step towards creating your own waxing recipe. You’ll need items such as sugar, lemon juice, water, and fabric strips. Don’t worry, these ingredients are easily accessible and can be found in your kitchen pantry.
Once you have everything ready, we’ll show you how to prepare the wax mixture and conduct a small patch test to ensure it’s suitable for your skin type.

From there, we’ll walk you through the application and removal process, providing tips and tricks along the way to help you achieve the best results.
So, get ready to take control of your hair removal routine and discover the wonders of DIY hair removal wax!
Key Takeaways
- Store leftover wax properly to maintain its quality and effectiveness.
- Label and date the wax container to track freshness and ensure you are using fresh wax.
- Maintain cleanliness and hygiene in your waxing routine to avoid infections or skin irritations.
- Thoroughly clean and sanitize your working area, hands, and waxing tools before and after each use to minimize the risk of introducing bacteria or impurities to the skin.
Gather Your Ingredients and Supplies
Now that you’ve decided to take control of your hair removal routine, it’s time to gather all the necessary ingredients and supplies to create your very own DIY waxing recipe.
One of the great things about DIY waxing is that you have the ability to choose from a variety of alternatives to traditional store-bought wax. Some popular options include sugar wax, honey wax, or even a combination of both. Each alternative has its own pros and cons, so it’s important to do some research and find the one that works best for you.

Once you’ve settled on an alternative, you’ll need to gather the ingredients. For sugar wax, you’ll need white sugar, lemon juice, and water. Honey wax requires honey, lemon juice, and water. These ingredients are readily available and can be found at your local grocery store.
In addition to the ingredients, you’ll also need a few supplies such as a saucepan, a candy thermometer to monitor the wax temperature, waxing strips or fabric strips, and a popsicle stick or spatula for application.
By gathering all of these ingredients and supplies, you’ll be well on your way to creating your very own DIY waxing recipe.
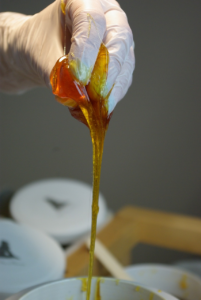
Prepare the Wax Mixture
Get ready to mix up your very own homemade wax blend for smooth and hair-free skin! To prepare the wax mixture, you’ll need to heat the wax to the correct temperature. This is important because if the wax’s too hot, it can cause burns, and if it’s too cold, it won’t effectively remove the hair. To ensure you’ve got the perfect temperature, use a candy thermometer to monitor the heat.

Now, let’s talk about alternative hair removal methods. While waxing’s a popular and effective method, there’re other options you can consider. One alternative’s sugaring, which involves using a sticky paste made from sugar, lemon juice, and water to remove hair.
Another option’s using an epilator, a device that plucks the hair from the root. Finally, you can also try using hair removal creams, which dissolve the hair at the surface of the skin.
Explore these alternatives to find the method that works best for you and your skin type.
Test the Wax on a Small Area
Before you proceed, it’s crucial to test the wax on a small area of your skin to ensure it’s safe and effective for you. Performing a sensitivity test is essential to avoid any adverse reactions or skin irritations. To conduct the test, follow these simple steps:
Cleanse: Start by thoroughly cleansing the area where you plan to apply the wax. This ensures that no dirt or oil interferes with the test results.
Apply Wax: Using a spatula or your fingers, apply a small amount of the DIY hair removal wax onto the chosen area. Make sure to spread it evenly and thinly.
Wait and Observe: Allow the wax to dry for the recommended time mentioned in the recipe. During this waiting period, pay attention to any sensations or reactions on your skin.
Remove and Check: Once the wax has dried, gently remove it in the direction opposite to hair growth. Examine the area for any redness, swelling, or discomfort. If you experience any adverse reactions, discontinue use immediately.

By conducting a sensitivity test, you can gauge how your skin reacts to the wax and determine if it’s suitable for your hair removal needs. Remember, everyone’s skin is different, so it’s important to assess the product’s compatibility with your skin before proceeding with a full application. If you find that the DIY wax doesn’t work well for you, there are alternative methods you can explore, such as sugaring or commercial waxing products. Keep experimenting until you find the hair removal method that best suits your preferences and skin type.
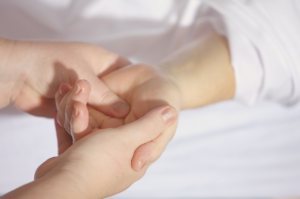
Apply and Remove the Wax
To achieve smooth and hair-free skin, it’s time to dive into the application and removal process of this incredible wax.
When it comes to applying the wax, make sure your skin is clean and dry. Using a spatula or wooden stick, spread a thin layer of the wax onto your skin in the direction of hair growth. Be careful not to apply too thick of a layer, as this may make the removal process more difficult.
Once the wax is applied, press a cloth strip firmly onto the wax and smooth it out in the direction of hair growth. Allow the wax to cool and harden for a few seconds, then hold your skin taut and quickly pull off the cloth strip in the opposite direction of hair growth. This technique will help remove the hair from the root, resulting in longer-lasting smoothness.
Now that you’ve successfully applied the wax, it’s time to move on to the removal process. Gently hold the skin taut with one hand and use the other hand to quickly pull off the cloth strip, making sure to keep it close to the skin and in the opposite direction of hair growth. Remember to breathe and stay calm, as the process may cause some discomfort.
If there are any leftover wax residue on your skin, you can easily remove it by applying a small amount of baby oil or olive oil and gently rubbing it in. This will help dissolve the wax and leave your skin feeling smooth and moisturized.
With these simple and effective application and removal techniques, you’ll be able to achieve salon-like results in the comfort of your own home.
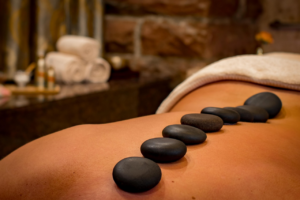
Soothe and Care for Your Skin
Once you’ve completed the waxing process, it’s important to soothe and care for your skin to ensure a smooth and healthy appearance. After removing the wax, gently cleanse the area with a mild soap or cleanser to remove any residue.
Pat the skin dry with a clean towel and then apply a soothing moisturizer or lotion. Look for products that contain ingredients like aloe vera or chamomile, as they have calming properties that can help reduce any redness or irritation.
Incorporating a regular skin care routine into your waxing routine is essential to maintain the health of your skin.
In addition to using commercial products, you can also explore natural remedies to soothe and care for your skin after waxing. Aloe vera gel, for example, is a great natural moisturizer that can help soothe and hydrate the skin. Apply a thin layer of aloe vera gel to the waxed area and let it dry.
Another natural remedy to consider is tea tree oil, which has antibacterial properties and can help prevent any infections or breakouts. Mix a few drops of tea tree oil with a carrier oil, such as coconut oil, and gently massage it into the skin.
These natural remedies can provide added benefits and contribute to the overall health and appearance of your skin after waxing.
Maintenance and Storage Tips
When it comes to storing leftover wax, it’s important to find a cool, dry place where it won’t be exposed to heat or moisture. This will help maintain its consistency and effectiveness for future use.
Additionally, keeping your waxing routine clean and hygienic is crucial to prevent infections or irritation. Make sure to sanitize your tools and equipment regularly and avoid double-dipping to maintain a safe and healthy waxing experience.
Storing leftover wax
After you’ve finished waxing, store any leftover wax in an airtight container to keep it fresh and ready for your next hair removal session. Properly storing wax is essential in prolonging its shelf life and ensuring its effectiveness. Here are some tips to help you store your leftover wax:
Choose the right container: Use a container that’s specifically designed for storing wax. Look for one that’s airtight and made of a material that won’t react with the wax or absorb its fragrance.
Keep it in a cool, dry place: Store the wax in a cool and dry area, away from direct sunlight or heat sources. Excessive heat can cause the wax to melt or become sticky, while moisture can promote the growth of bacteria and mold.
Avoid contamination: Make sure to clean the container before storing the wax to prevent any contamination. Any residual wax on the container can mix with the fresh wax, affecting its quality.
Label and date the container: To keep track of the wax’s freshness, label the container with the type of wax and the date it was made. This will help you know when it’s time to discard any unused wax and make a fresh batch.
By following these storage tips, you can ensure that your leftover wax stays fresh and effective for your next DIY hair removal session.
Maintaining cleanliness and hygiene in your waxing routine
Maintaining cleanliness and hygiene in your waxing routine is crucial to ensure optimal results and prevent any potential infections or skin irritations. One of the most important aspects of maintaining cleanliness is practicing proper sanitization during waxing.
Before starting the waxing process, make sure to thoroughly clean and sanitize the area where you’ll be working. This includes wiping down the surface with a disinfectant and using clean towels or disposable paper sheets to cover it.
Additionally, it’s essential to wash your hands thoroughly with soap and warm water before and after each waxing session to minimize the risk of transferring bacteria or germs to your skin.
Another important aspect of maintaining cleanliness in your waxing routine is using clean and sterilized waxing tools. Before each use, ensure that your waxing tools, such as spatulas, strips, and applicators, are properly cleaned and sterilized. You can do this by washing them with warm soapy water and then disinfecting them with rubbing alcohol or a sterilizing solution.
Using dirty or contaminated tools can introduce bacteria or other impurities to your skin, increasing the risk of infections or irritations. Additionally, it’s advisable to replace disposable items like waxing strips or spatulas after each use to maintain cleanliness and prevent the spread of bacteria.
By following proper sanitization practices and using clean and sterilized waxing tools, you can maintain hygiene in your waxing routine and minimize the risk of any unwanted infections or skin irritations. Remember to prioritize cleanliness to achieve the best results and keep your skin healthy and happy.
Frequently Asked Questions
Can I use regular household items as substitutes for the ingredients in the wax recipe?
Yes, you can definitely use regular household items as alternatives for the ingredients in the wax recipe. Many people have found success with using items like sugar, lemon juice, and honey to create their own homemade wax. These ingredients are not only easily accessible in most households, but they also offer a cost-effective solution for hair removal.
While the effectiveness of homemade wax may vary depending on individual preferences and hair types, using household items as substitutes can be a convenient and budget-friendly option for those who prefer a DIY approach.
How long will the homemade wax last before it expires?
The shelf life of homemade wax can vary depending on the storage techniques you use. Properly stored, the wax can last for several months before it expires.
To ensure its longevity, store the wax in an airtight container in a cool, dry place away from direct sunlight. This will help prevent the wax from drying out or becoming contaminated. Additionally, make sure to keep the wax away from any moisture or water, as this can cause it to spoil more quickly.
By following these storage techniques, you can extend the shelf life of your homemade wax and continue to enjoy its benefits for an extended period of time.
Can I reuse the wax mixture or do I have to make a fresh batch each time?
You can definitely reuse the wax mixture for multiple hair removal sessions, but it’s important to keep in mind the shelf life of homemade wax. The longevity of your wax will depend on the ingredients used and how well it is stored.
Generally, homemade wax can last for several months if stored in an airtight container in a cool and dry place. However, it’s essential to regularly check for any signs of spoilage, such as changes in color, texture, or smell. If you notice any of these signs, it’s best to discard the wax and make a fresh batch to ensure its effectiveness and safety.
So, while you can reuse the wax mixture, make sure to monitor its shelf life to ensure optimal results.
Are there any special precautions I should take before applying the wax to sensitive areas like the bikini line?
Before applying the wax to sensitive areas like the bikini line, there are some precautions you should take to ensure your safety and minimize any discomfort.
First, make sure the wax is at the right temperature – not too hot to avoid burns, but warm enough to effectively remove the hair. Test a small amount on your wrist before applying it to the bikini line.
Additionally, clean the area thoroughly and dry it completely to prevent any infections. Trim the hair to a suitable length for waxing. Apply a thin layer of baby powder to absorb any excess moisture and help the wax adhere better to the hair.
Finally, remember to pull the wax strip in the opposite direction of hair growth for optimal results and less pain.
Following these safety precautions will help make your DIY waxing experience on the bikini line more comfortable and effective.
Can I use the homemade wax on areas with tattoos or other skin conditions?
Yes, you can use homemade wax on tattooed skin and other skin conditions. However, it’s important to take certain precautions. Before applying the wax, make sure that the skin is clean and dry.
Check if there are any open wounds or areas of inflammation on the tattooed skin or any other skin condition. If there are, it’s best to avoid waxing those areas as it can irritate the skin further.
Additionally, be gentle when applying and removing the wax to minimize any potential damage to the tattoo or affected skin. Always do a patch test on a small area first to ensure that the homemade wax doesn’t cause any adverse reactions.
If you experience any discomfort or irritation, it’s advisable to seek professional advice or consider alternative hair removal methods.
Conclusion
In conclusion, making your own DIY hair removal wax can be a cost-effective and convenient alternative to professional waxing. By gathering the necessary ingredients and supplies, preparing the wax mixture, and testing it on a small area of your skin, you can ensure that the wax is suitable for your needs.
Then, by applying and removing the wax carefully, you can achieve smooth and hair-free skin.
After waxing, it’s important to soothe and care for your skin by applying a gentle moisturizer or aloe vera gel. This will help to alleviate any redness or irritation and keep your skin hydrated. Additionally, maintaining and storing your homemade wax properly is key to its longevity. Ensure that you store it in a cool and dry place to prevent spoilage or contamination.
By following these steps and tips, you can create your own DIY hair removal wax and enjoy the benefits of smooth and hair-free skin in the comfort of your own home. So why not give it a try and see the results for yourself? You may just find that DIY waxing becomes your new go-to hair removal method.